Wood siding brings timeless charm to your home, but when cracks, holes, or rot show up, it’s time for a fix.
Restoring your siding not only keeps your exterior looking sharp but also shields your home from costly damage.
This guide walks you through repairing wood siding step-by-step so your home stays solid, stylish, and weather-ready.
How to repair wood siding on a house?
To repair wood siding, replace damaged or rotting boards. Sand the area smooth, apply wood filler for small cracks, and then repaint or stain for a fresh, durable finish.
Key Takeaways
- Wood siding can be repaired by replacing damaged boards, filling in cracks, and treating areas with rot.
- Regular maintenance, such as painting and sealing, can help extend the lifespan of your wood siding.
- Proper tools and materials are essential to complete the repair effectively and efficiently.
Identifying the Damage

Before you begin repairing wood siding, it’s important to assess the damage to determine the best approach for fixing it.
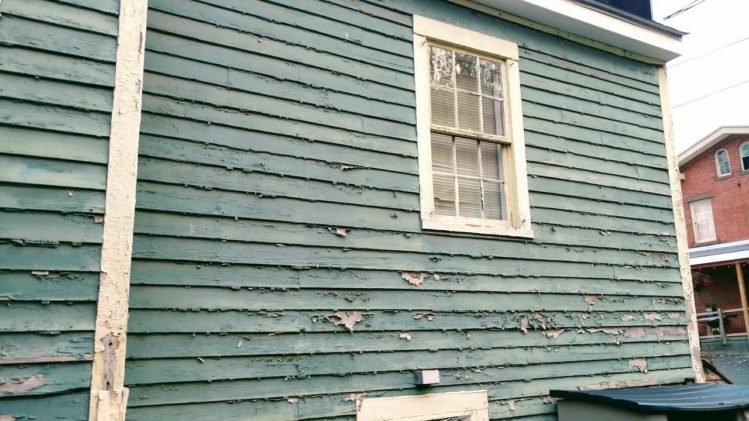
Wood siding can experience a variety of issues, including cracking, rotting, and warping. Below are some common types of damage and how to identify them.
Cracks and Splits
Over time, exposure to the sun and changes in temperature can cause the wood to expand and contract, resulting in cracks and splits.
These are usually easy to spot, especially after harsh weather.
Signs of Damage: Visible cracks or splits in the surface of the siding.
Solution: These can typically be repaired by filling in the cracks and repainting the surface.
Wood Rot
Wood rot occurs when moisture gets trapped in the wood, leading to the growth of fungi that break down the wood fibres.
This is a common issue, especially in areas with high humidity or heavy rainfall.
Signs of Damage: Soft, discolored, or spongy areas in the wood that give way when pressed.
Solution: Remove the rotted sections of the siding and replace them with new boards.
Warping
Wood siding can warp due to moisture, poor installation, or environmental conditions. Warped wood can detract from your home’s appearance and affect the protection the siding offers.
Signs of Damage: Bending or curling of the siding along the edges.
Solution: If the warp is severe, it may require replacing the affected boards.
Nail Holes and Small Dents
Nail holes or dents can occur from pressure or impacts, and while they may seem minor, they can lead to water penetration if left unaddressed.
Signs of Damage: Small holes or depressions in the wood surface.
Solution: Fill the holes with wood filler or putty, sand the area smooth, and repaint.
Materials and Tools You Will Need
To repair wood siding effectively, you’ll need the right tools and materials. Below is a list of essentials for the job.
Materials:
- Wood filler or putty (for small holes and cracks)
- Replacement wood siding boards (for larger sections of damage)
- Exterior-grade wood sealant
- Primer and paint (to match the existing colour of the siding)
- Wood preservative (for treating rotted areas)
- Caulk (for sealing gaps)
Tools:
- Hammer or nail gun (for installing new boards)
- Pry bar (for removing damaged boards)
- Putty knife (for applying wood filler)
- Saw (for cutting replacement boards to size)
- Sandpaper or sander (for smoothing surfaces)
- Paintbrush or sprayer (for applying paint)
- Measuring tape (for accurate measurements)
- Safety gear, including gloves and goggles (for protection during repairs)
Step-by-Step Guide to Repairing Wood Siding
Now that you’ve gathered your materials and tools, it’s time to begin the repair process. Here’s a step-by-step guide to help you complete the task.
Step 1: Prepare the Area
Start by clearing the area around the damaged siding. Move any obstacles and ensure that you can easily access the damaged section.
If necessary, use a ladder to reach higher areas. Safety should always be your top priority, so make sure to wear gloves, goggles, and a dust mask if required.
Step 2: Remove the Damaged Siding
For large areas of damage, such as rotted or warped boards, you’ll need to remove the affected sections of siding. Use a pry bar to carefully lift the nails and remove the damaged boards.
If the boards are nailed in tightly, a hammer may be needed to loosen them.
Tip: Take care not to damage the surrounding siding while removing the damaged pieces. If the boards are difficult to remove, use a saw to cut them into smaller sections.
Step 3: Replace the Damaged Boards
Measure the size of the gap left by the removed boards and cut new siding pieces to fit. Make sure the replacement boards match the size and style of the existing siding.
If you’re replacing a section with rotting wood, treat the new board with a wood preservative to prevent future damage.
Tip: If you can’t find an exact match for your existing siding, you can either paint the new board to match or opt for a similar style that will blend in.
Step 4: Fill in Small Cracks and Holes
For smaller issues like cracks, splits, or nail holes, use wood filler or putty to fill the damaged area.
Apply the filler with a putty knife and smooth it out to ensure an even surface. Allow the filler to dry according to the manufacturer’s instructions.
Tip: Sand the filled areas once they are dry to ensure a smooth finish before applying paint.
Frequently Asked Questions (FAQs)
1. How do I know if my wood siding needs to be repaired?
Check for visible cracks, signs of rot, warping, or holes. If you notice any of these issues, it’s time to repair or replace the affected sections of siding.
2. Can I paint over wood filler on my siding?
Yes, you can paint over wood filler after it dries and is sanded smooth. Ensure that the surface is properly prepared to ensure good paint adhesion.
3. How often should I inspect my wood siding?
It’s a good idea to inspect your wood siding at least once a year, especially after heavy storms or winter weather. Regular inspections help catch problems early before they become costly repairs.
Conclusion
Repairing wood siding is a relatively straightforward process if you follow the right steps and use the right materials.
Whether you’re fixing cracks, replacing rotted sections, or simply refreshing the appearance of your siding, the key to success is proper preparation, the right tools, and a little patience.
By keeping your wood siding well-maintained and regularly checking for signs of wear, you can keep your home looking beautiful and well-protected for years to come.


